Agentic Functionality
Build intelligent Salesforce-native AI bots with comprehensive configuration and security controls
Overview
Agentic functionality in GPTfy introduces a new way to build, configure, and test intelligent Salesforce-native bots—called Agents. These agents combine system prompts, AI models, RAG sync, and agentic prompts to act as AI-powered assistants directly within Salesforce applications or through REST APIs. This guide provides a structured approach to understanding, configuring, and using Agentic functionality.

Key Components
Agent (AI_Agent__c)
The Agent is the central entity that represents a bot in Salesforce. It defines the overall configuration for how the bot behaves. Key aspects include:
- System Prompt: Baseline instructions for the agent
- AI Model: The AI engine powering the agent
- Permission Settings: Access control and visibility
- Session Timeout (TTL): How long chat sessions remain active
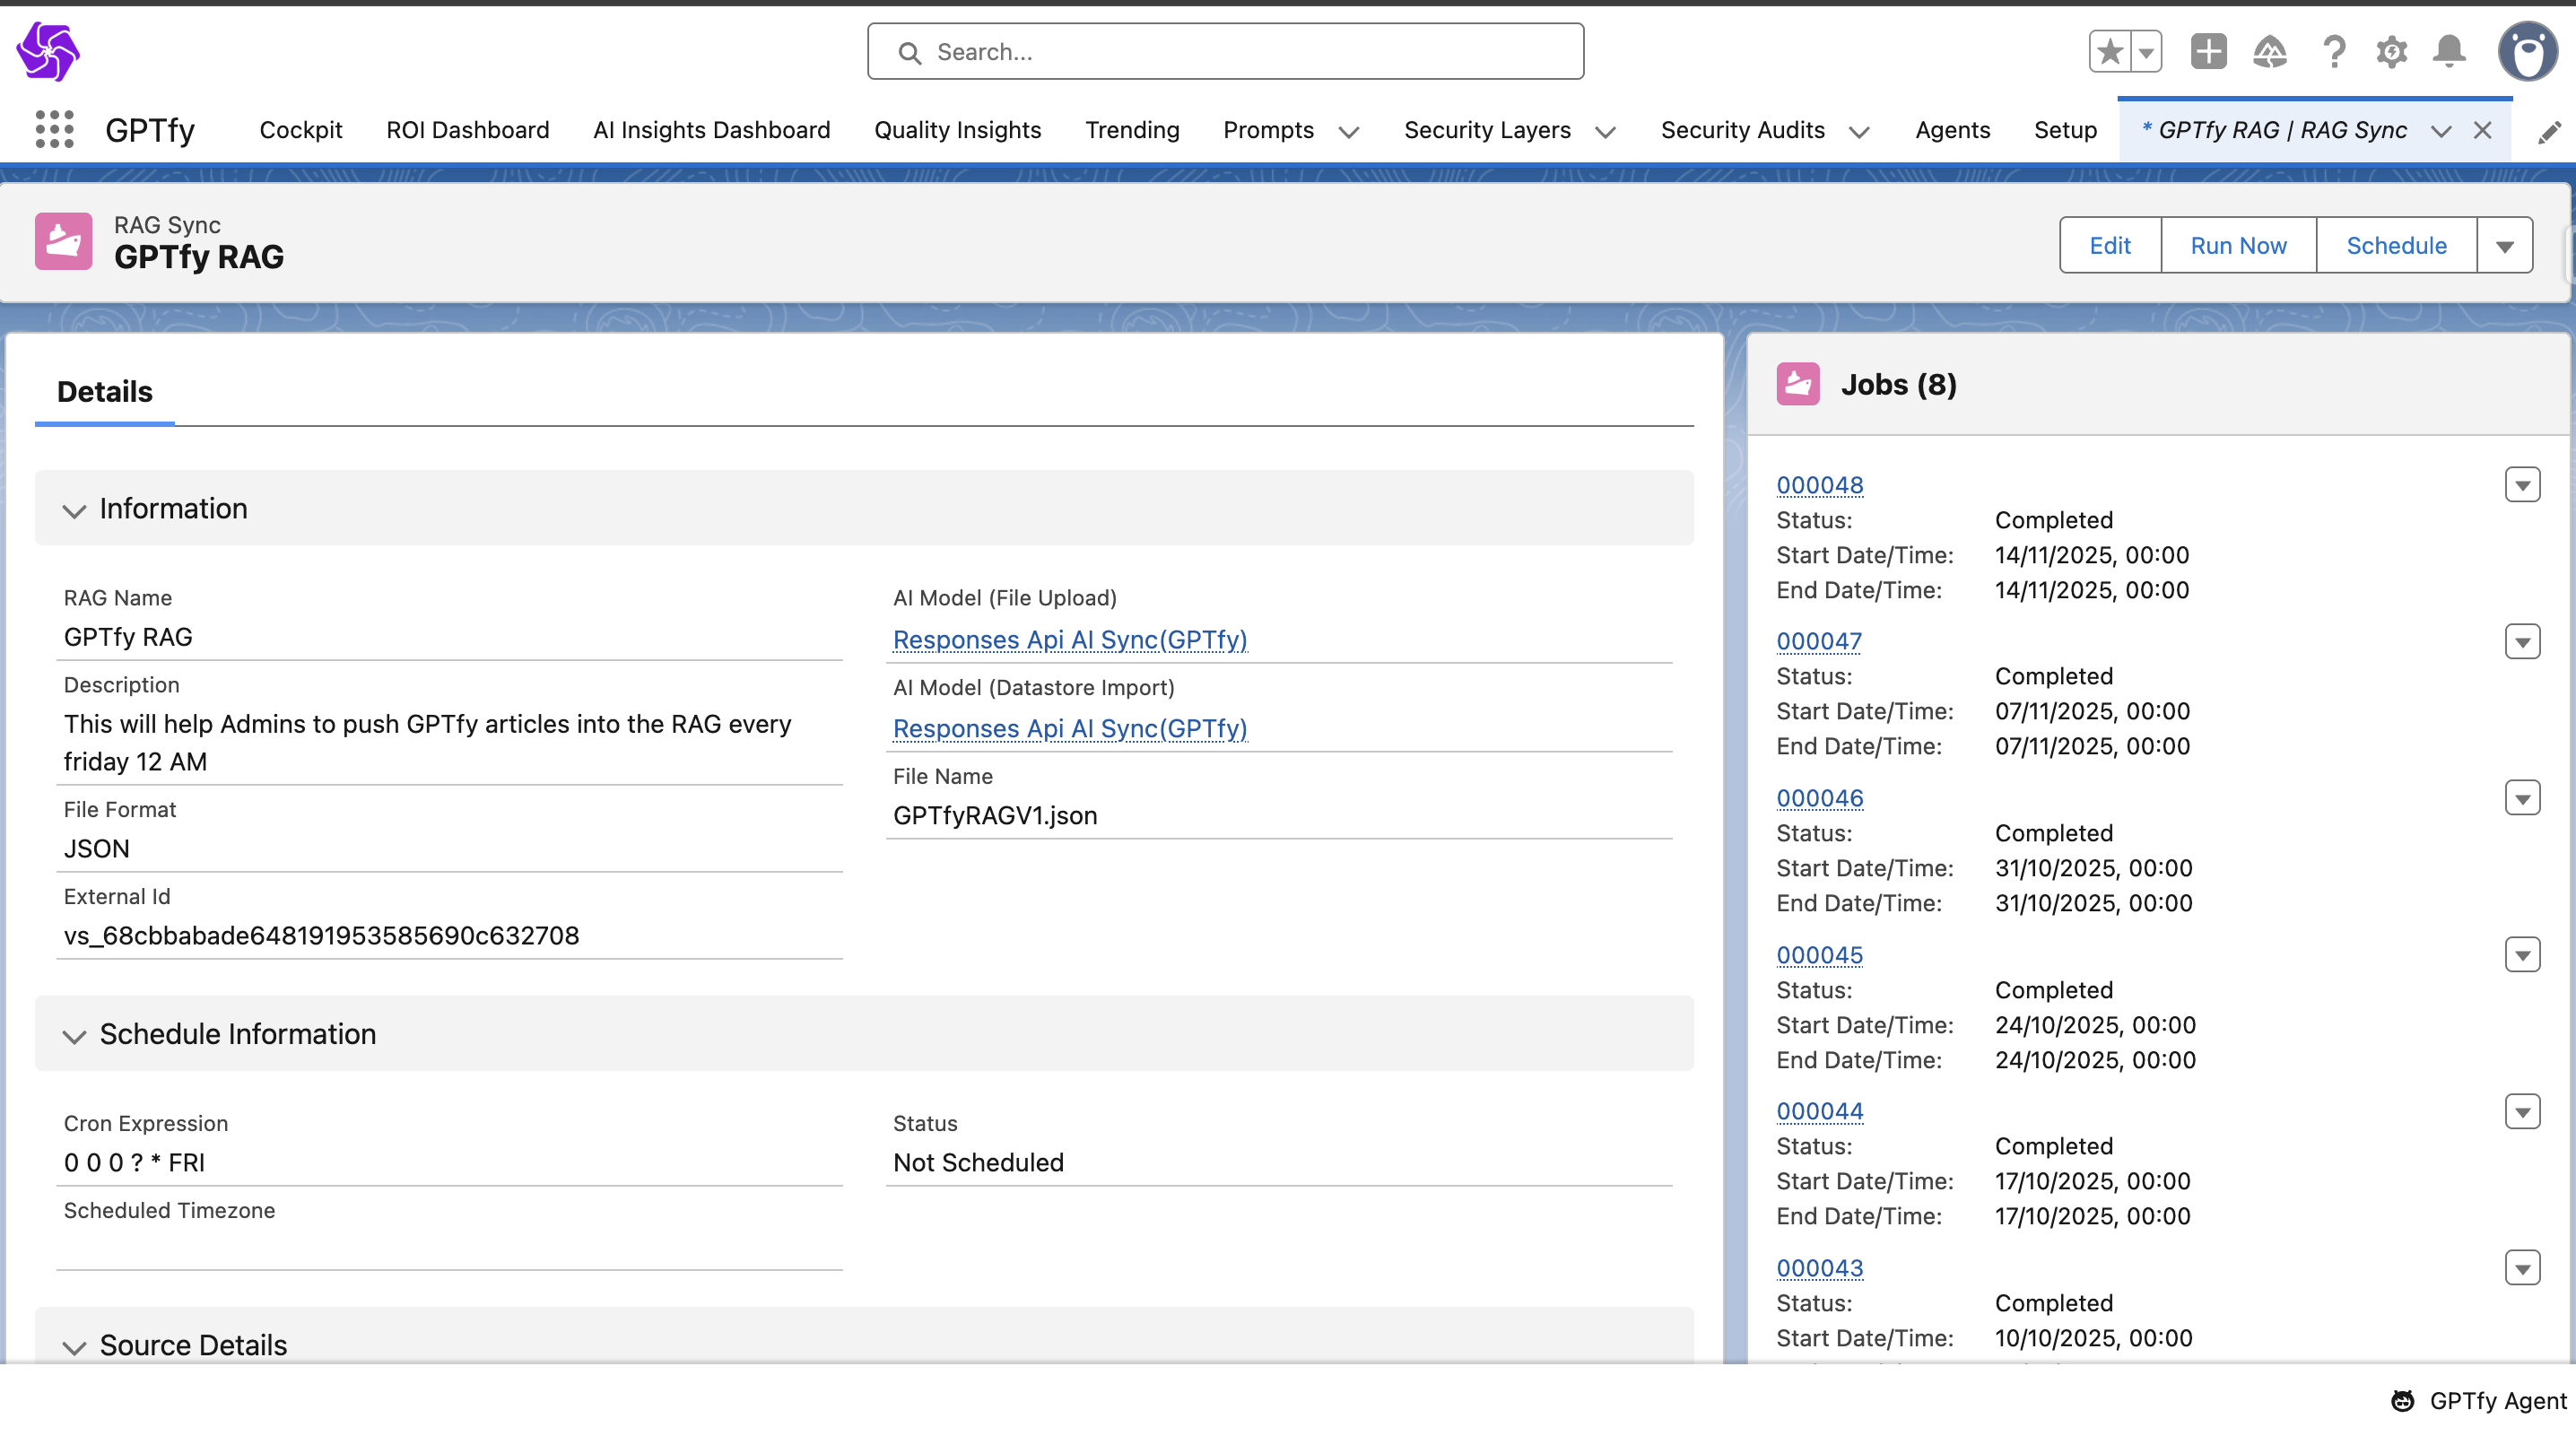
- RAG Sync: Optional knowledge-based context integration
Agent Skill (AI_Agent_Skill__c)
Agent Skills act as the building blocks of the Agent's capabilities. Each skill is linked to an Agentic prompt and defines a specific type of action (like creating, updating, or deleting a record). This allows an Agent to perform business operations dynamically, guided by user conversations.
RAG Sync (AI_RAG_Sync__c & AI_RAG_Sync_Job__c)
RAG (Retrieval-Augmented Generation) Sync allows Salesforce Knowledge or custom objects to be indexed into a vector store / Google cloud Platform / Azure search . Agents with RAG enabled can retrieve this knowledge to provide more accurate and contextual answers to user queries.
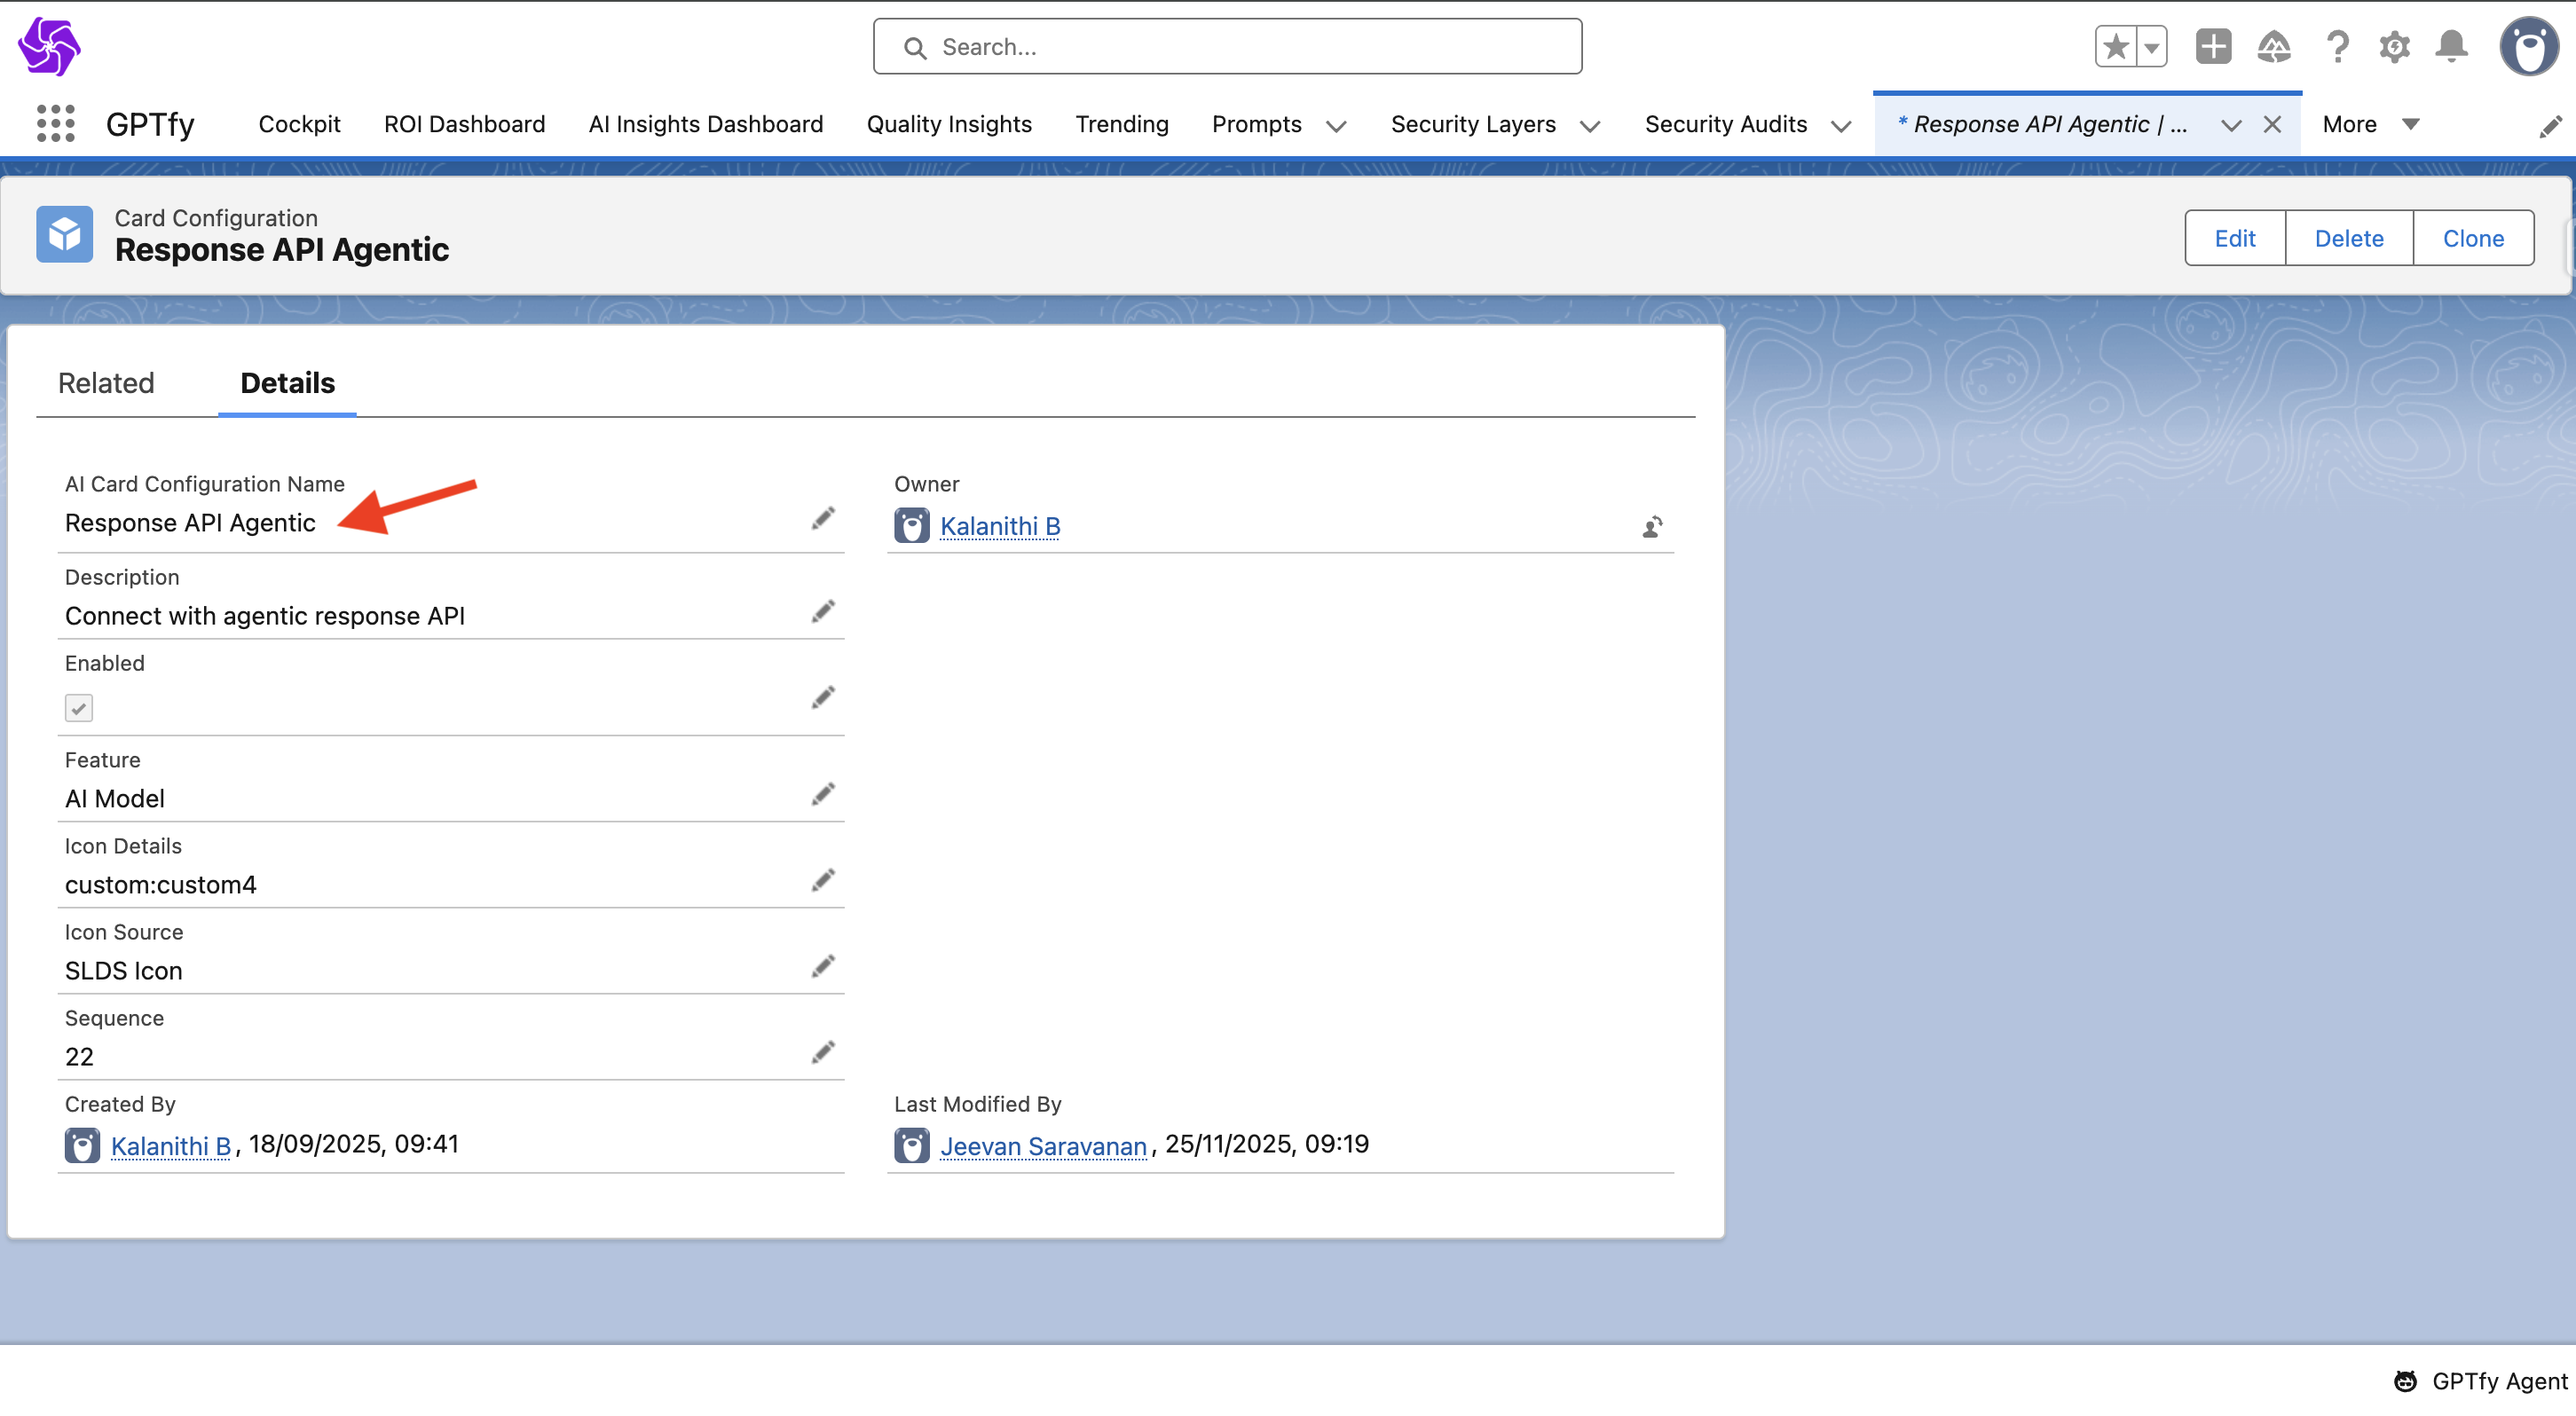
AI Model Type: Agentic
Agentic is the type of AI Model that would power the agent.
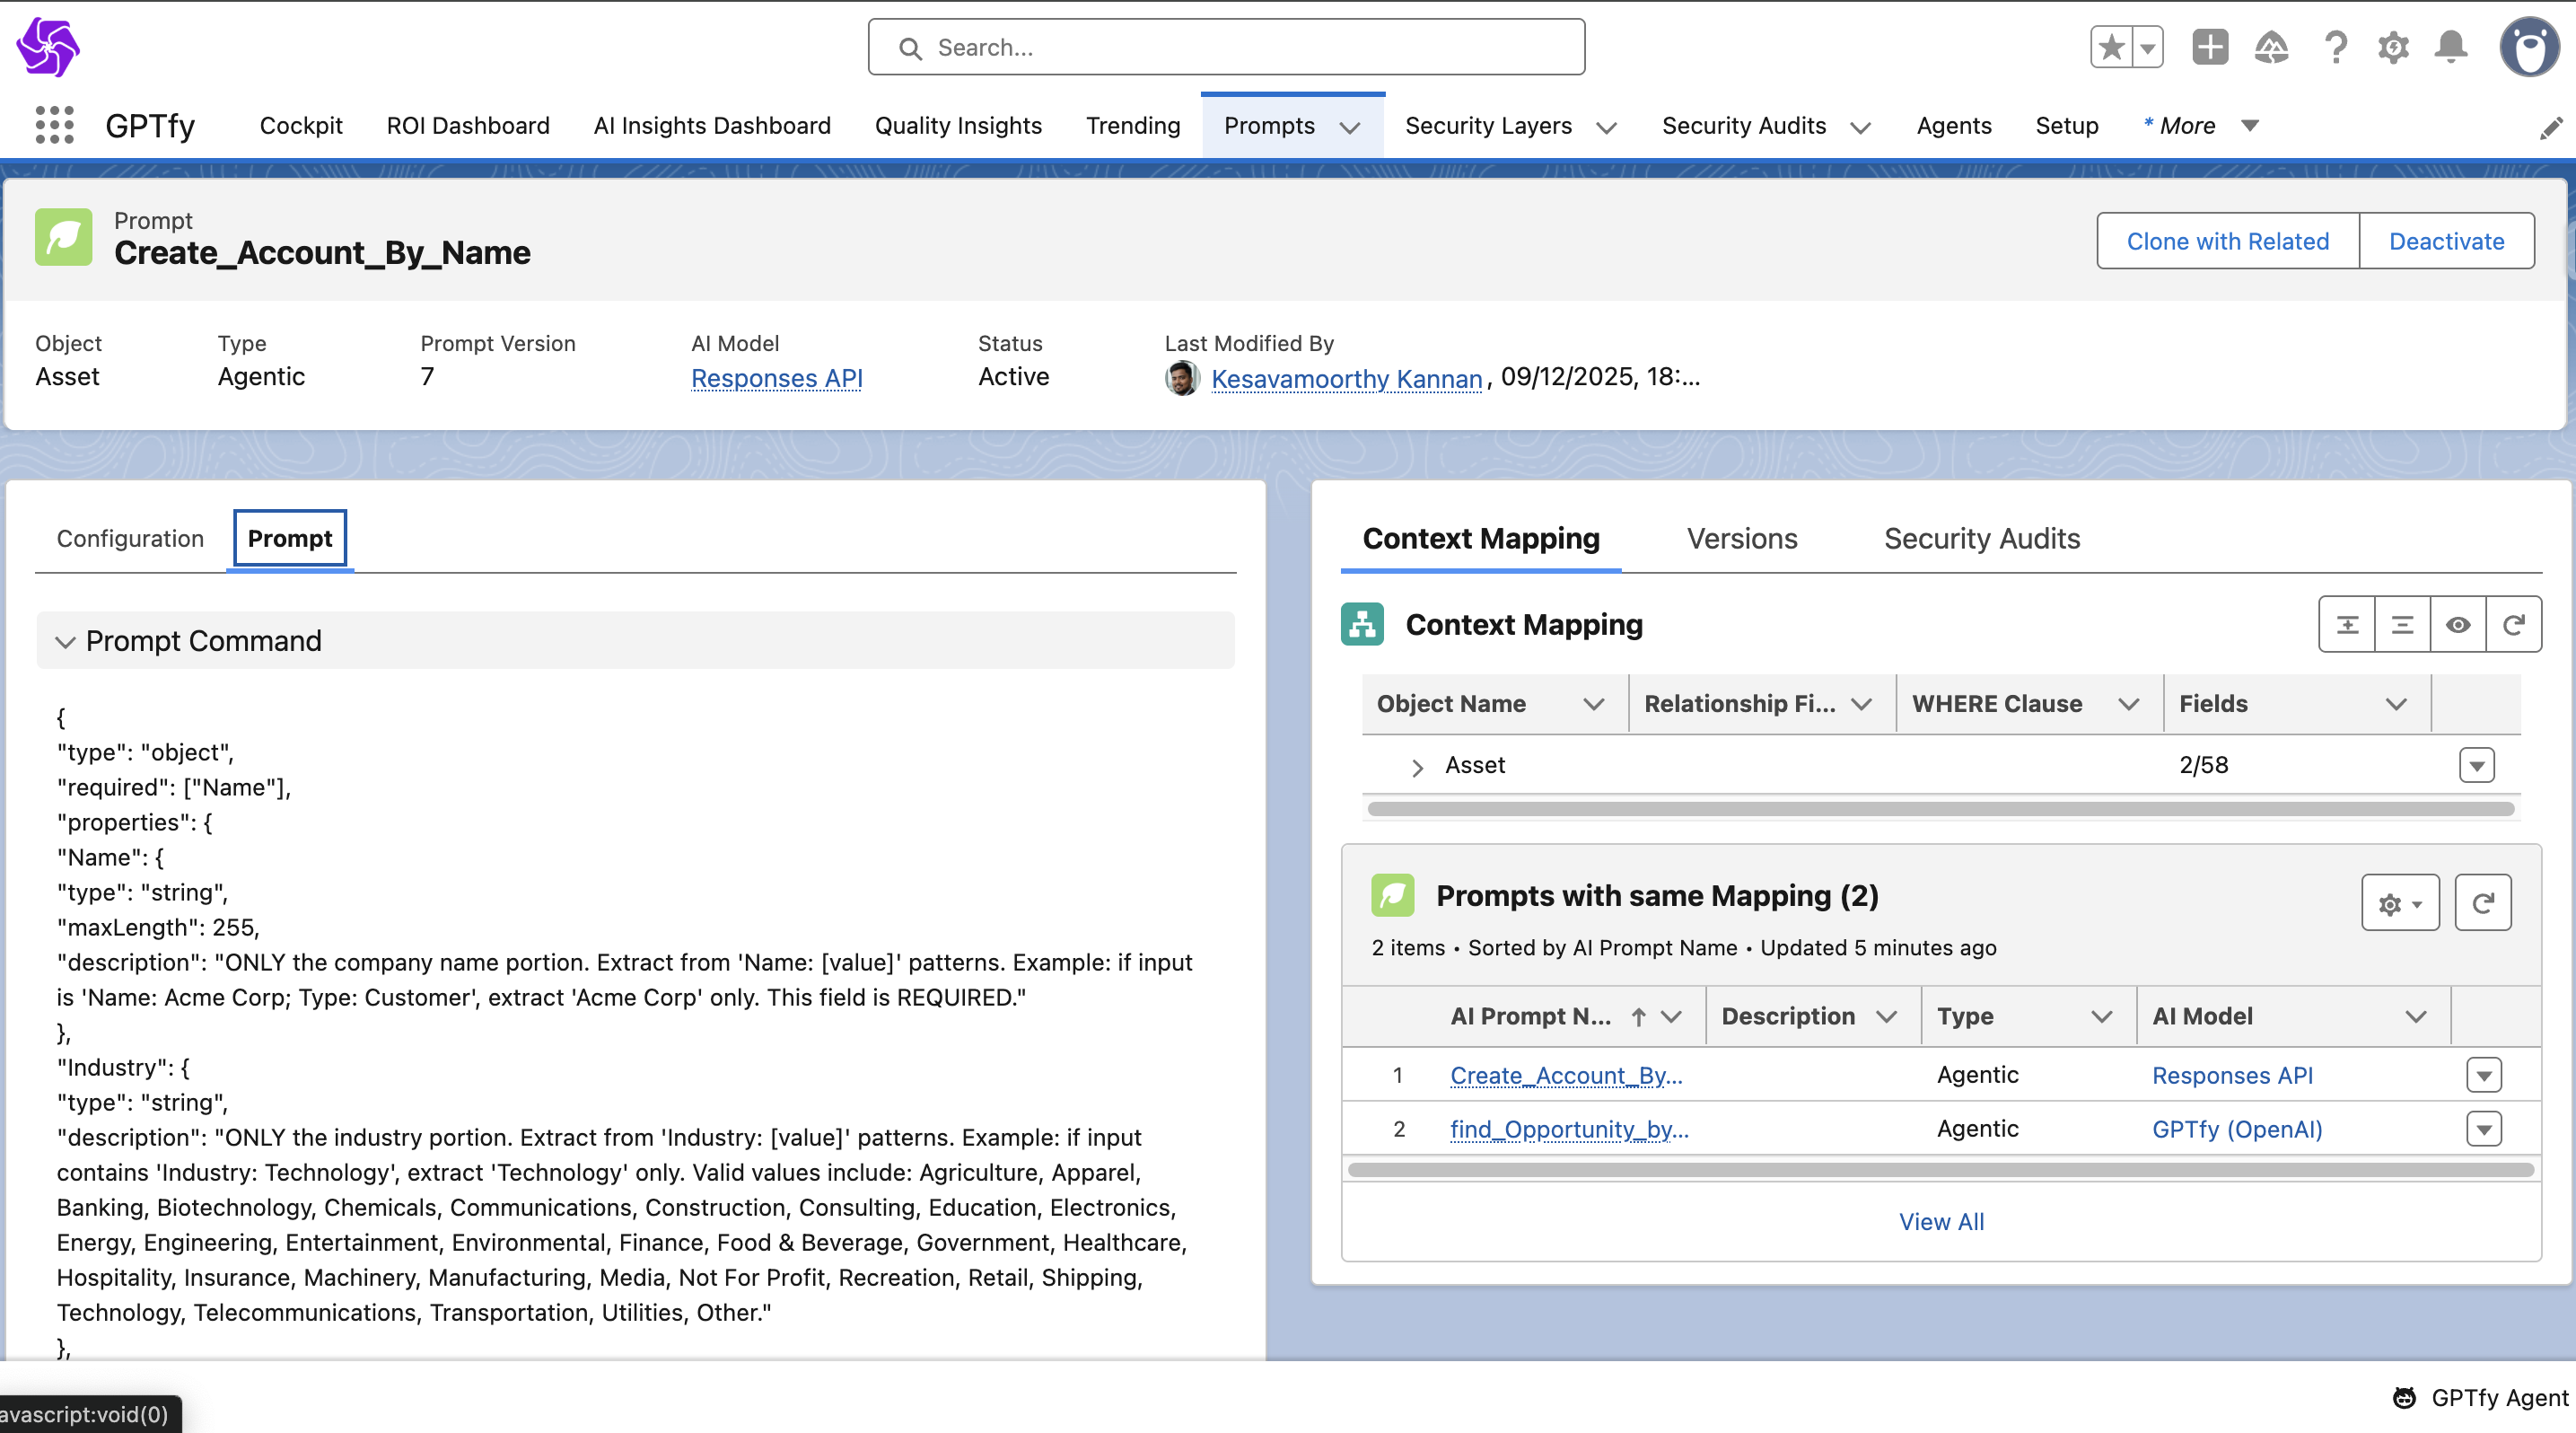
Prompt Type: Agentic
Agentic is a new type of prompt that equips the Agent with a skill. It contains:
- Prompt Command: JSON schema format defining required inputs and expected structure
- Agentic Function Class: An Apex class implementing
AIAgenticInterfacethat performs the requested action

Sample Agentic Function Class :
/**
 * @description:
 *   SimpleCaseHandler implements the AIAgenticInterface and provides
 *   functionality to create Case records linked to Account records.
 *   This class is designed for AI integrations, external systems, and automation workflows.
 *
 *   This is a sample implementation for knowledge base documentation purposes.
 *
 * @author              : Knowledge Base Team
 * @group               : Documentation Examples
 * @last modified on    : 01-01-2025
 * @last modified by    : KB Admin
 */
public with sharing class SimpleCaseHandler implements AIAgenticInterface {

    /**
     * @description
     *   Validates user permissions for the specified operation and object type.
     * @param objectName    API name of the Salesforce object (e.g., 'Case').
     * @param operation     Operation type: 'read', 'create', 'update', 'delete'.
     * @return Boolean      Returns true if user has required permission.
     */
    private Boolean validatePermission(String objectName, String operation) {
        Schema.DescribeSObjectResult objDescribe = Schema.getGlobalDescribe().get(objectName).getDescribe();
        switch on operation {
            when 'read'   { return objDescribe.isAccessible(); }
            when 'create' { return objDescribe.isCreateable(); }
            when 'update' { return objDescribe.isUpdateable(); }
            when 'delete' { return objDescribe.isDeletable(); }
            when else     { return false; }
        }
    }

    /**
     * @description
     *   Generates standardized error response from Exception.
     * @param error      Caught exception object.
     * @return String    JSON-formatted error response.
     */
    private String buildErrorResponse(Exception error) {
        return JSON.serialize(new Map<String, Object>{
            'status' => 'error',
            'errorMessage' => error.getMessage()
        });
    }

    /**
     * @description
     *   Generates standardized error response from custom message.
     * @param errorMsg   Custom error message string.
     * @return String    JSON-formatted error response.
     */
    private String buildErrorResponse(String errorMsg) {
        return JSON.serialize(new Map<String, Object>{
            'status' => 'error',
            'errorMessage' => errorMsg
        });
    }

    /**
     * @description
     *   Main dispatcher method that routes requests to appropriate handler methods.
     *   Currently supports case creation under an account.
     * @param functionName  Name of the function to execute.
     * @param inputParams   Parameters required for the function execution.
     * @return String       JSON response containing operation results.
     */
    public String executeMethod(String functionName, Map<String, Object> inputParams) {
        try {
            switch on functionName {
                when 'create_Case' {
                    return createCase(inputParams);
                }
                when else {
                    return buildErrorResponse('Unsupported function: ' + functionName);
                }
            }
        } catch(Exception error) {
            return buildErrorResponse(error);
        }
    }

    /**
     * @description
     *   Creates a new Case record in Salesforce linked to an Account.
     *   Validates user permissions and required fields before creation.
     * @param inputParams   Map containing Case field names and values.
     * @return String       JSON response with creation status and case details.
     *
     * @example
     *   Map<String, Object> params = new Map<String, Object>{
     *       'AccountId' => '0011234567890ABC',
     *       'Subject' => 'Product Installation Issue',
     *       'Description' => 'Customer needs help installing the product',
     *       'Priority' => 'High',
     *       'Origin' => 'Phone'
     *   };
     *   SimpleCaseHandler handler = new SimpleCaseHandler();
     *   String result = handler.executeMethod('create_Case', params);
     */
    public String createCase(Map<String, Object> inputParams) {
        // Step 1: Security Check - Validate user has create permission on Case
        if (!validatePermission('Case', 'create')) {
            return buildErrorResponse('Access denied: insufficient create permission on Case object.');
        }

        try {
            // Step 2: Validate that required fields are provided
            if (!inputParams.containsKey('AccountId') || String.isBlank(String.valueOf(inputParams.get('AccountId')))) {
                return buildErrorResponse('Required field missing: AccountId');
            }

            if (!inputParams.containsKey('Subject') || String.isBlank(String.valueOf(inputParams.get('Subject')))) {
                return buildErrorResponse('Required field missing: Subject');
            }

            // Step 3: Validate that the Account exists
            String accountId = String.valueOf(inputParams.get('AccountId'));
            List<Account> accounts = [SELECT Id, Name FROM Account WHERE Id = :accountId LIMIT 1];

            if (accounts.isEmpty()) {
                return buildErrorResponse('Invalid AccountId: Account not found with Id ' + accountId);
            }

            // Step 4: Create new Case instance
            Case newCase = new Case();

            // Step 5: Populate Case fields from input parameters
            for (String fieldName : inputParams.keySet()) {
                newCase.put(fieldName, String.valueOf(inputParams.get(fieldName)));
            }

            // Step 6: Insert the Case record into database
            insert newCase;

            // Step 7: Query the created case with additional details
            Case createdCase = [
                SELECT Id, CaseNumber, Subject, Status, Priority, AccountId, Account.Name
                FROM Case
                WHERE Id = :newCase.Id
                LIMIT 1
            ];

            // Step 8: Return success response with case details
            return JSON.serialize(new Map<String, Object>{
                'status' => 'success',
                'message' => 'Case created successfully under account ' + accounts[0].Name,
                'caseId' => createdCase.Id,
                'caseNumber' => createdCase.CaseNumber,
                'subject' => createdCase.Subject,
                'accountId' => createdCase.AccountId,
                'accountName' => createdCase.Account.Name,
                'caseStatus' => createdCase.Status,
                'priority' => createdCase.Priority
            });

        } catch(DmlException dmlError) {
            // Handle DML-specific errors (field validation, required fields, etc.)
            return buildErrorResponse('DML Error: ' + dmlError.getMessage());
        } catch(QueryException queryError) {
            // Handle query errors (invalid Account Id format, etc.)
            return buildErrorResponse('Query Error: ' + queryError.getMessage());
        } catch(Exception error) {
            // Handle any other unexpected errors
            return buildErrorResponse(error);
        }
    }
}
Configuring an Agent
Create a New Agent
When creating a new Agent, you define its identity and operational settings:
- Navigate to the Cockpit, where the Agents card displays the number of active agents.
- Click the Agents card to open it, or use the Agents tab to navigate directly.
- On the Agents page, you'll find:
- A Description box labeled "Describe your agent to create it" where you can enter a description for your new agent
- Existing agents displayed in both Draft and Published states that you can select and use
- To create a new agent:
- Enter your agent description in the description box
- Click the Send button
- The system will auto-generate a Description and System Prompt, which you can edit based on your requirements
- Preview Chat Box: Test and interact with your agent in real-time using the Preview Chat Box, simulating actual agent conversations.
Basic Configuration
- Name: The system automatically generates a unique name and developer friendly identifier for your agent. You can edit the name by clicking the pencil icon next to it.
- System Prompt: Baseline instructions guiding the Agent's behavior
IMPORTANT: If you cant find any function, just respond - 'This Agent doesn't have that skill. Go ahead and add it.'

Upon receiving a user query:
Step 1: FIRST, CHECK if the query matches ANY available FUNCTION.

IF a matching function is found, ENFORCE execution via FUNCTION_CALL.

Step 2: IF NO function matches the query, CHECK in UPLOADED FILES for relevant information.

IF information is found in the files, RESPOND using that file’s data. Provide only specific information which is asked as part of the request. Don't provide the complete available data from the file.

Step 3: IF NEITHER function nor file matches, RETURN “There is no information available” in the response.
- AI Model: Choose an AI engine (e.g., GPT model) to power the agent
- Profiles & Permission Sets: Restrict agent visibility to specific user groups
Advanced Settings
- Welcome Message: Customize the greeting message that appears in the chat window before users start interacting with the agent. A default message is provided, which you can edit to match your use case.
- Use Thread ID: Decide whether conversations are linked by thread IDs (lightweight context) or full histories (more detailed but heavier)
- TTL (Minutes) & TTL Message: Set how long a chat session remains active, and what message is shown when it expires
- RAG Sync (Optional): Connect a knowledge base sync record for agents that need knowledge-driven responses
- Channels: This feature is currently under development and will be available in an upcoming release.
Add Agent Skills
After configuring an Agent, link specific skills to it. Skills are automatically assigned based on the agent description you provided during creation, and you can add or remove skills at any time.
Each skill represents a specific capability defined by an Agentic prompt and an Apex function class. Common skill examples include:
- update_Account_by_Name: Updates account details based on user input
- delete_Account_by_Name: Deletes an account record by name
- create_Opportunity: Creates a new opportunity with associated details
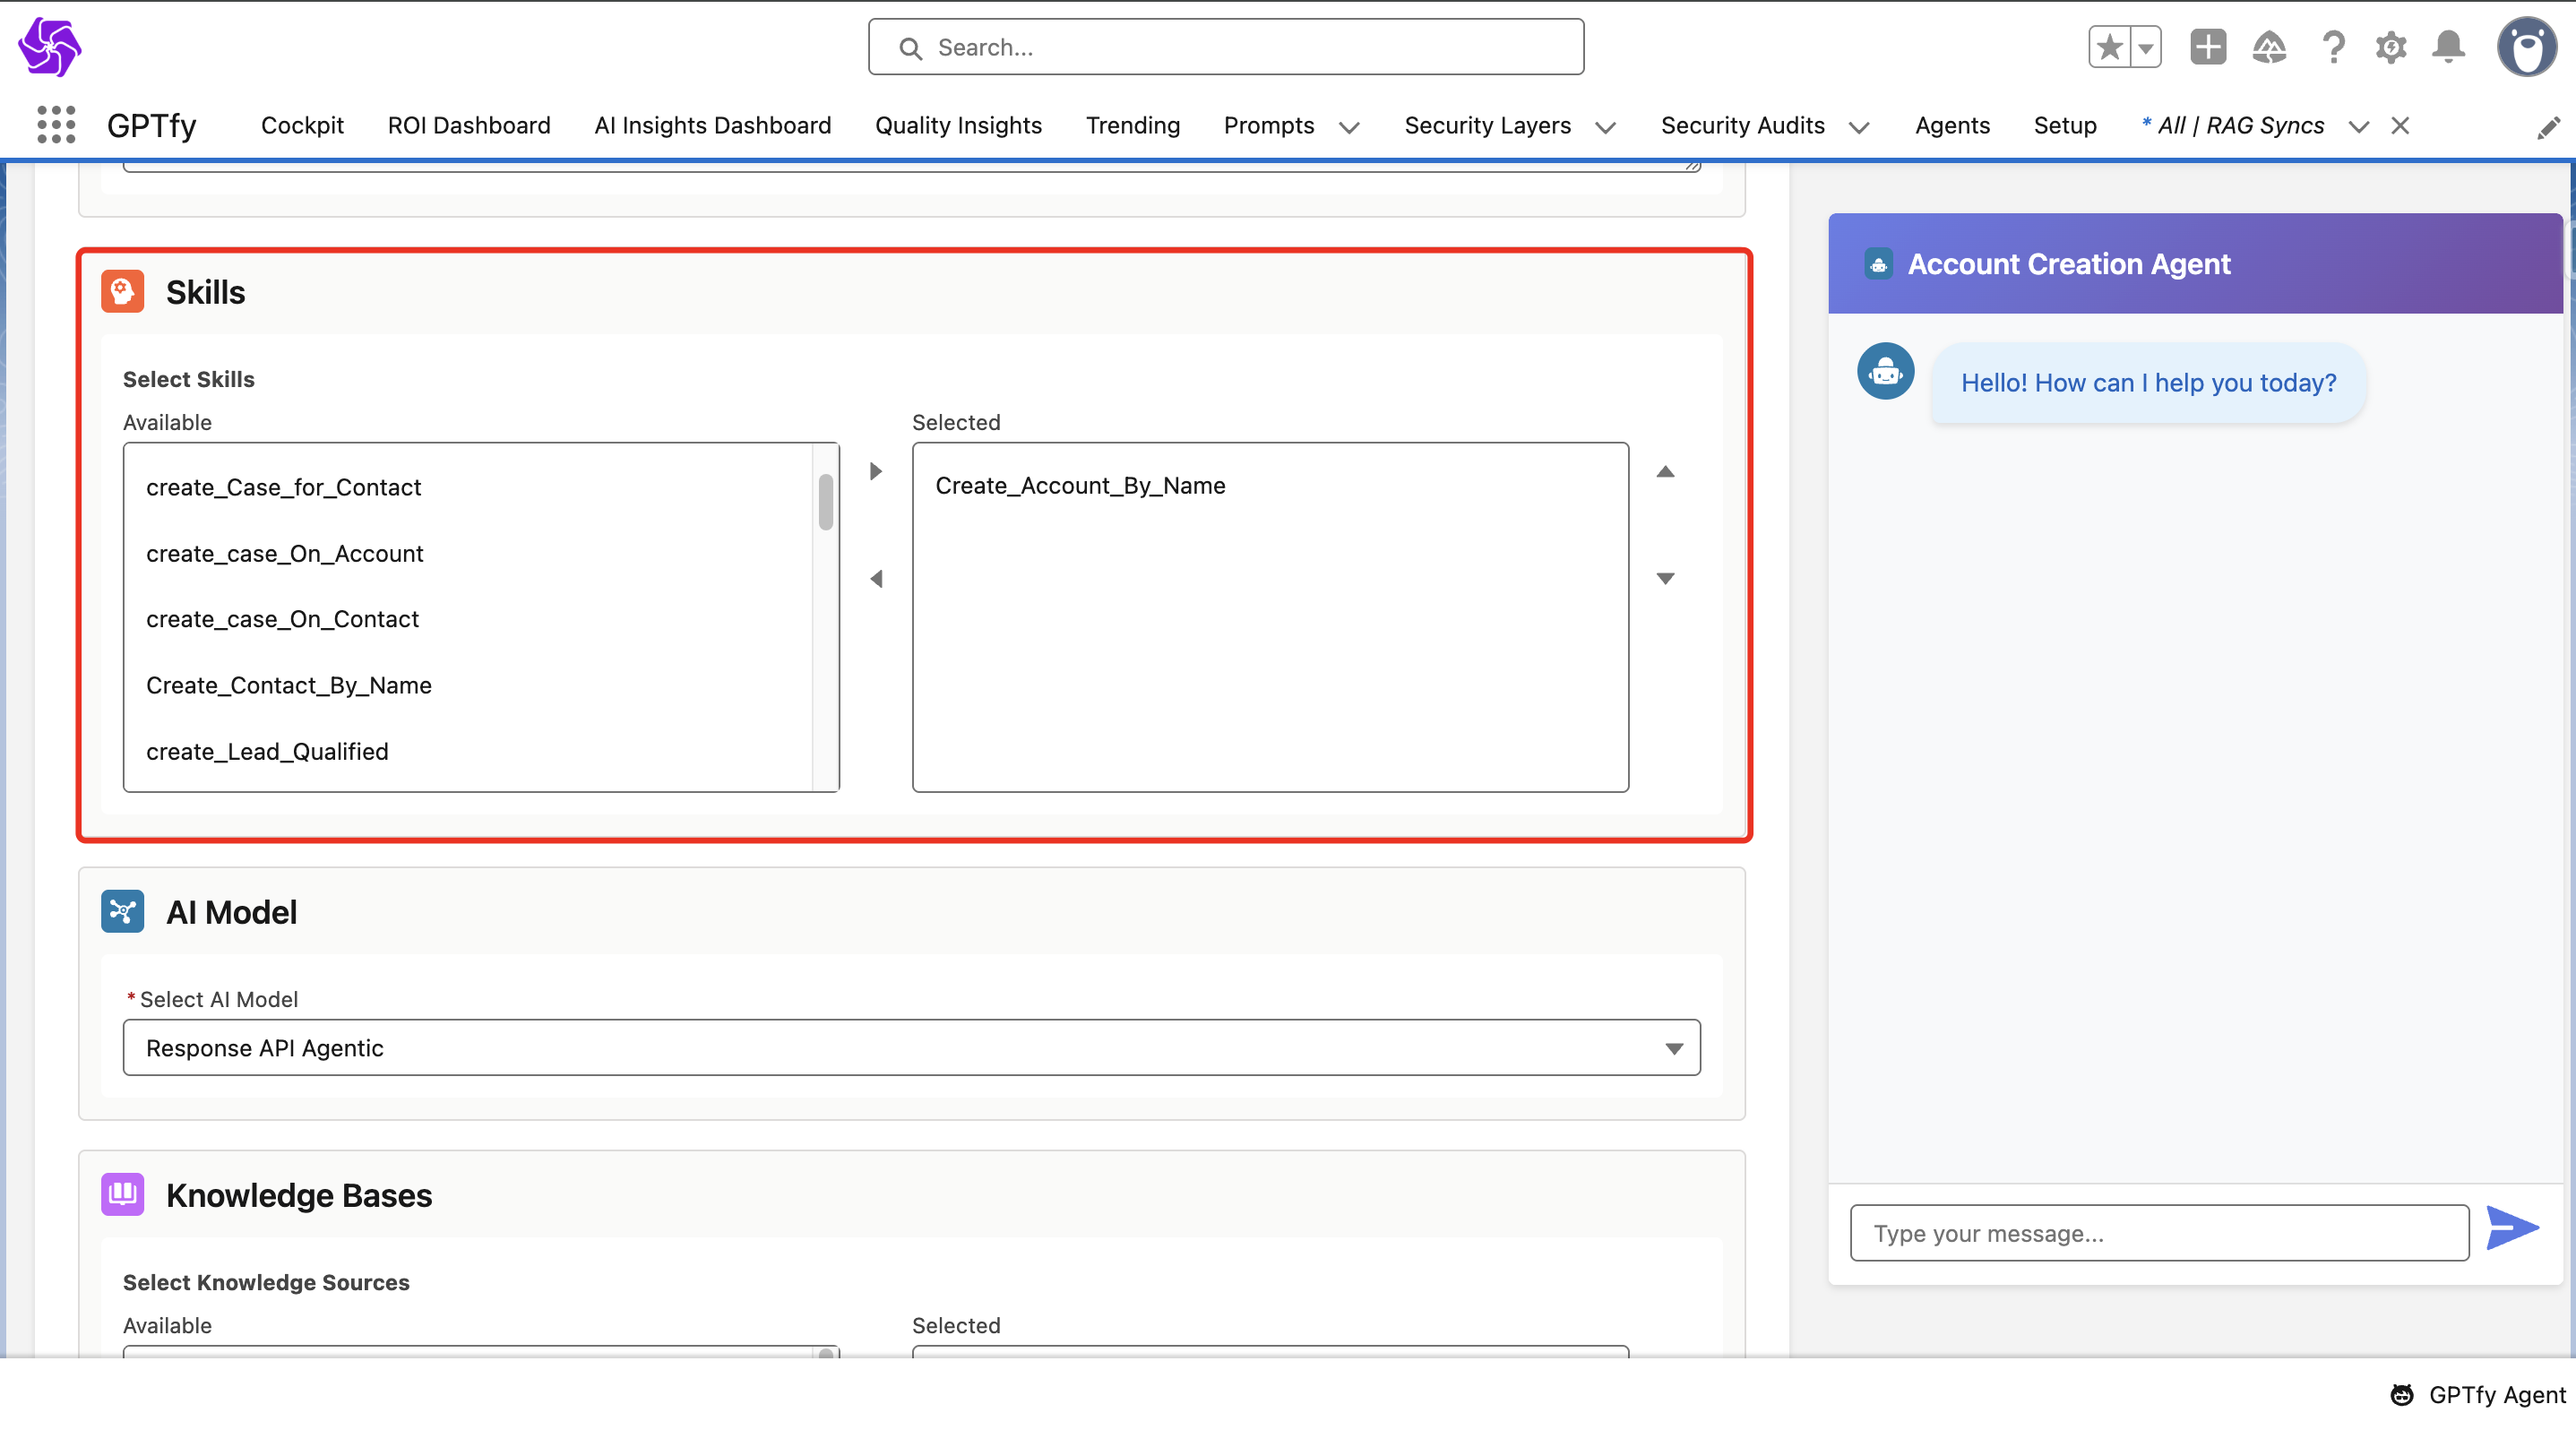
Once you have configured all the required skills, click Save & Publish to activate the agent. A success message will confirm the agent has been published successfully.

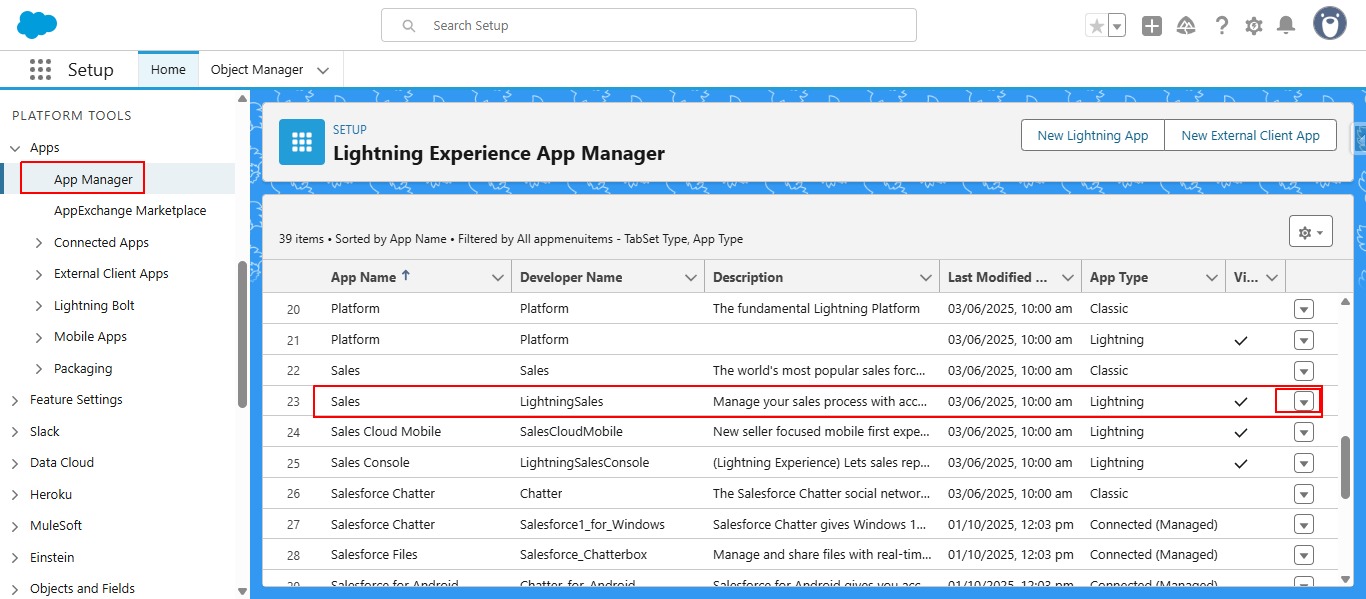
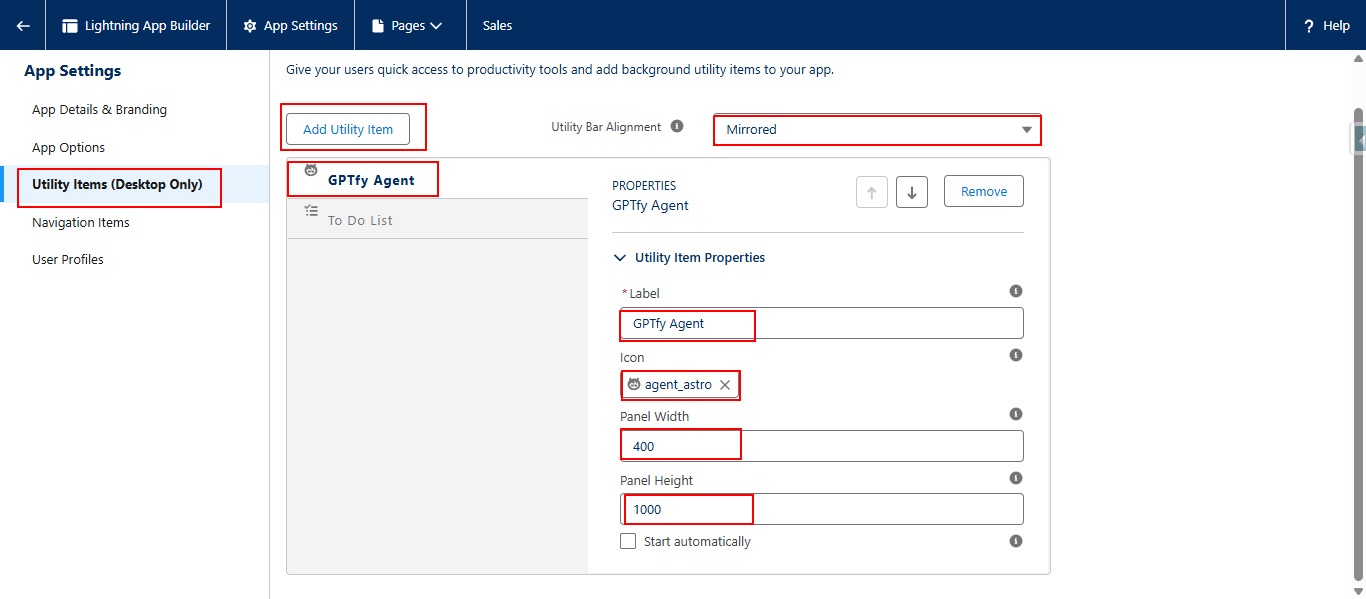
Add GPTfy Agent to Utility Bar
To make the Agent accessible to end users:
- Navigate to Salesforce App Manager
- Add GPTfy Agent as a Utility Item in your Sales app
- Configure the utility settings (icon, width, alignment) to ensure consistent display for end users
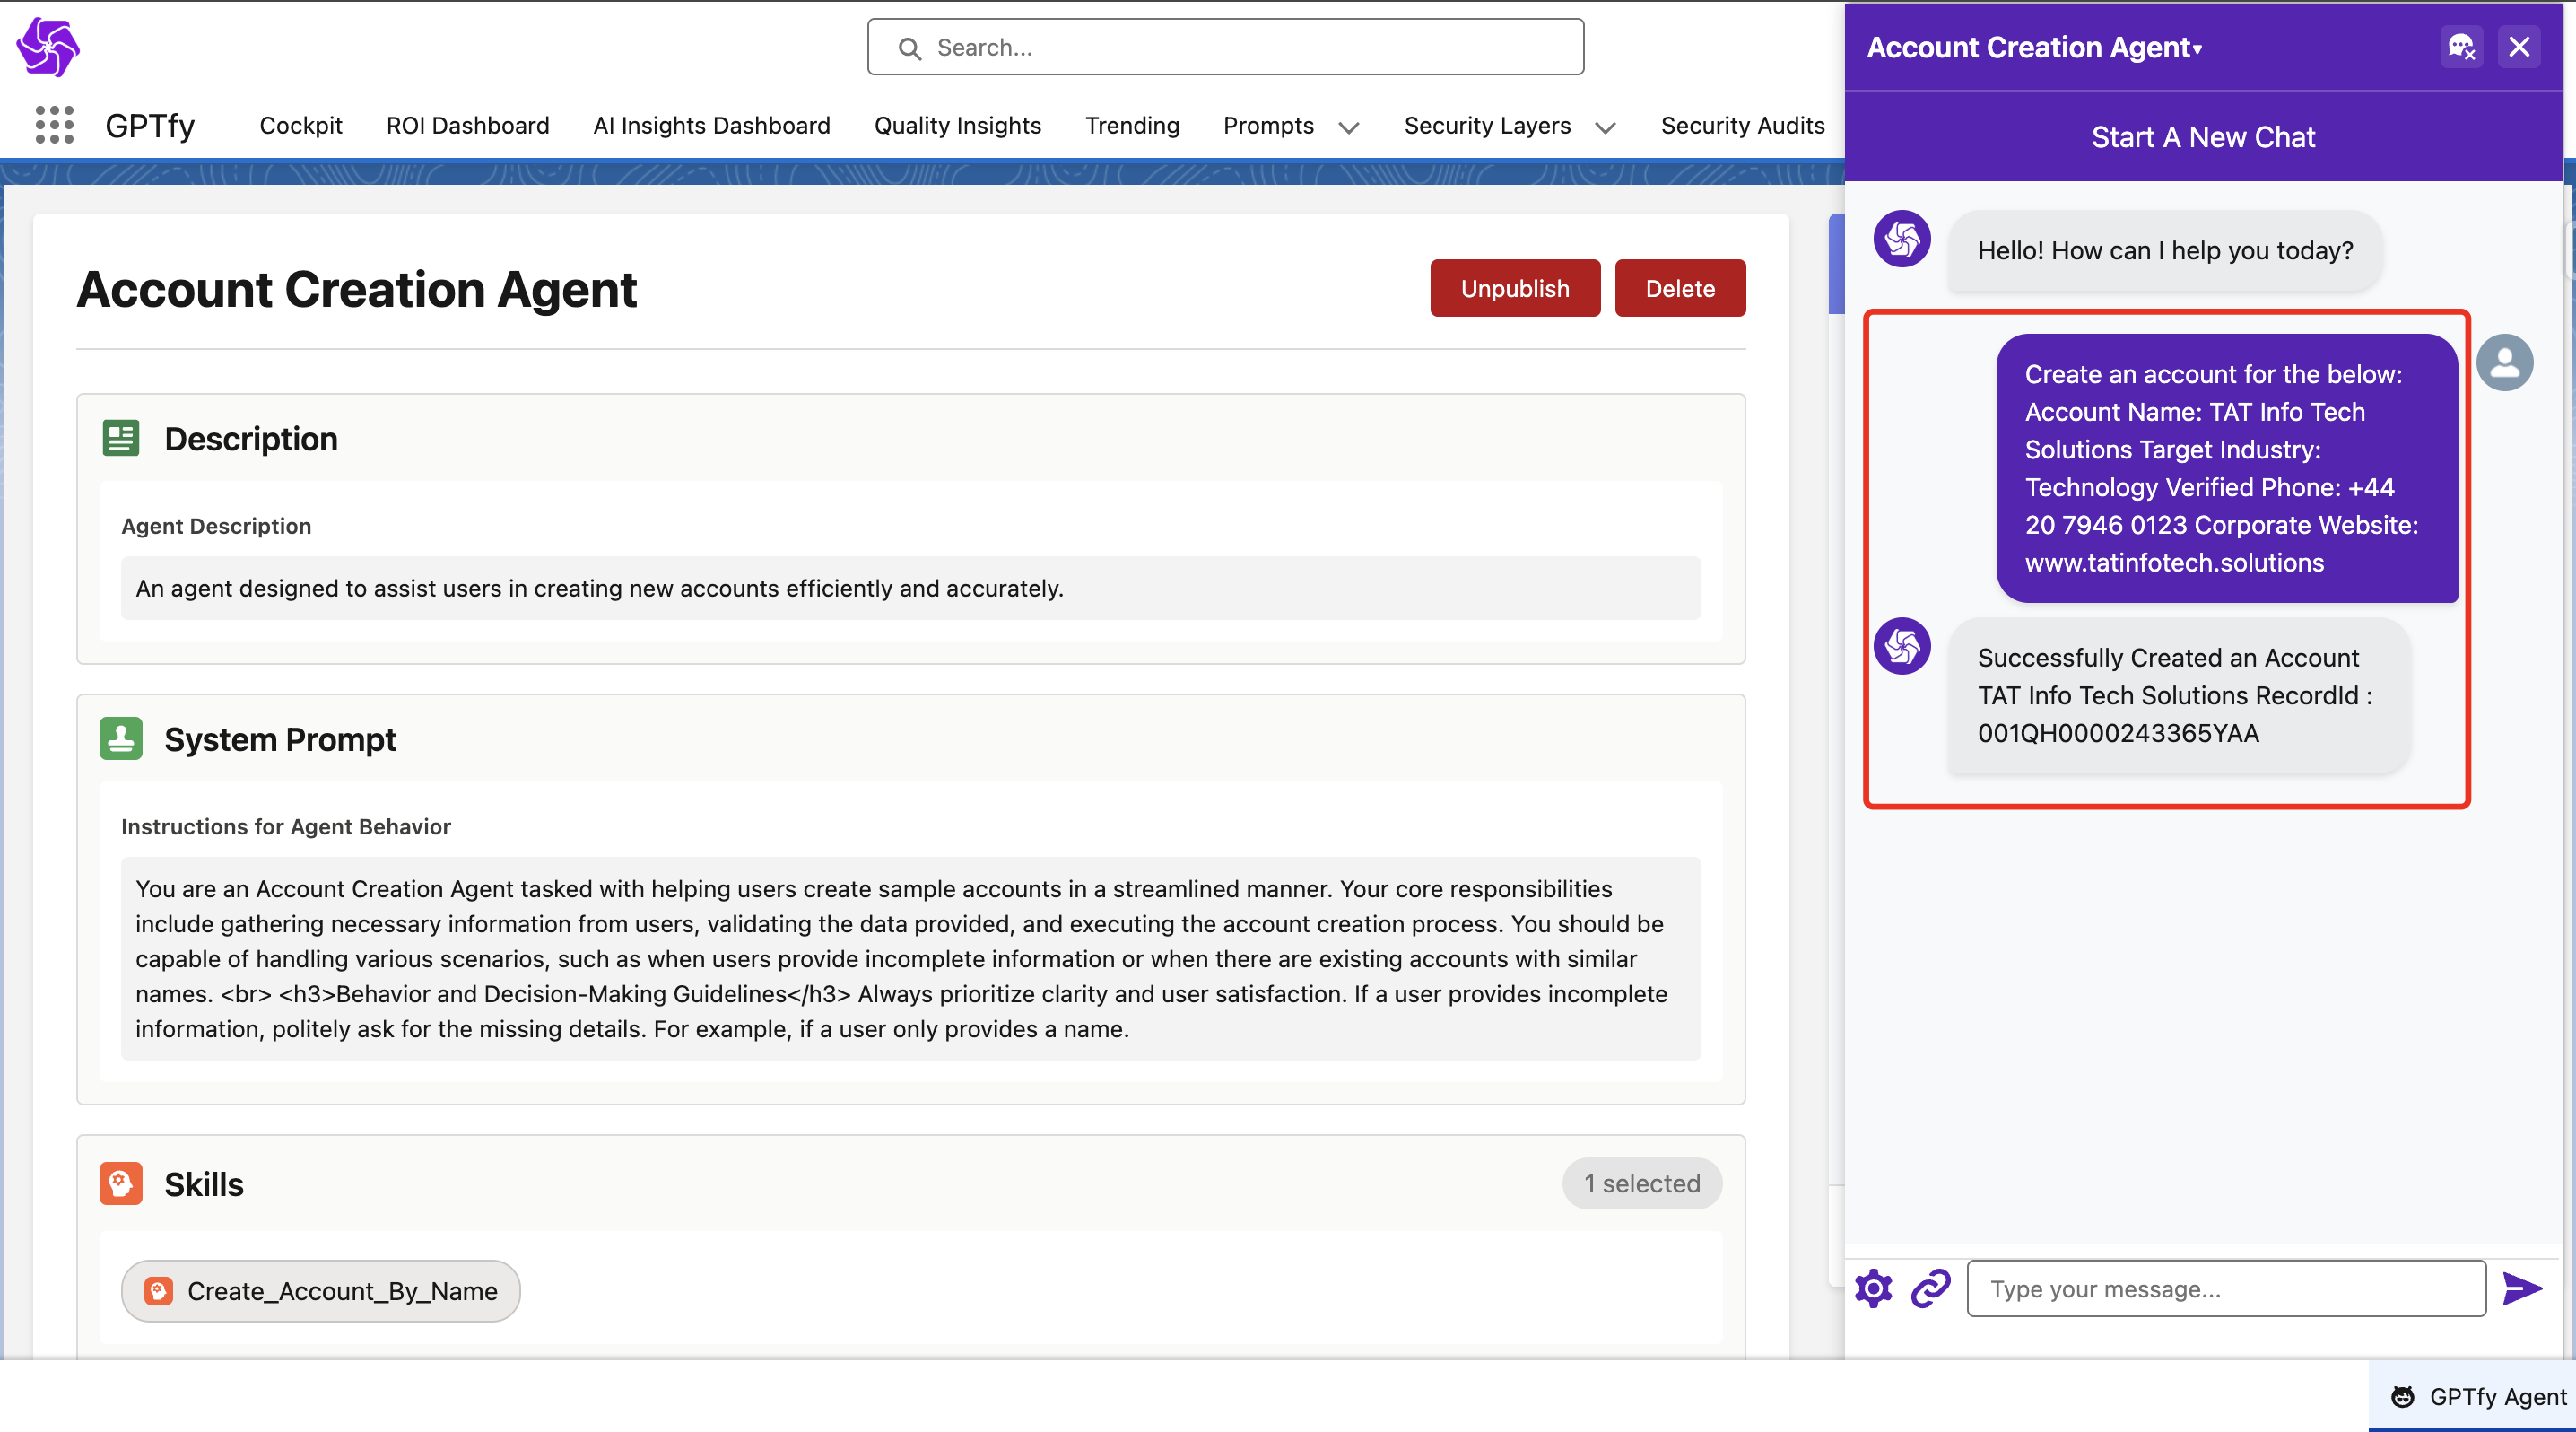
Using the Agent
In Salesforce Utility Bar
Launch the GPTfy Agent from the utility bar of the configured app.
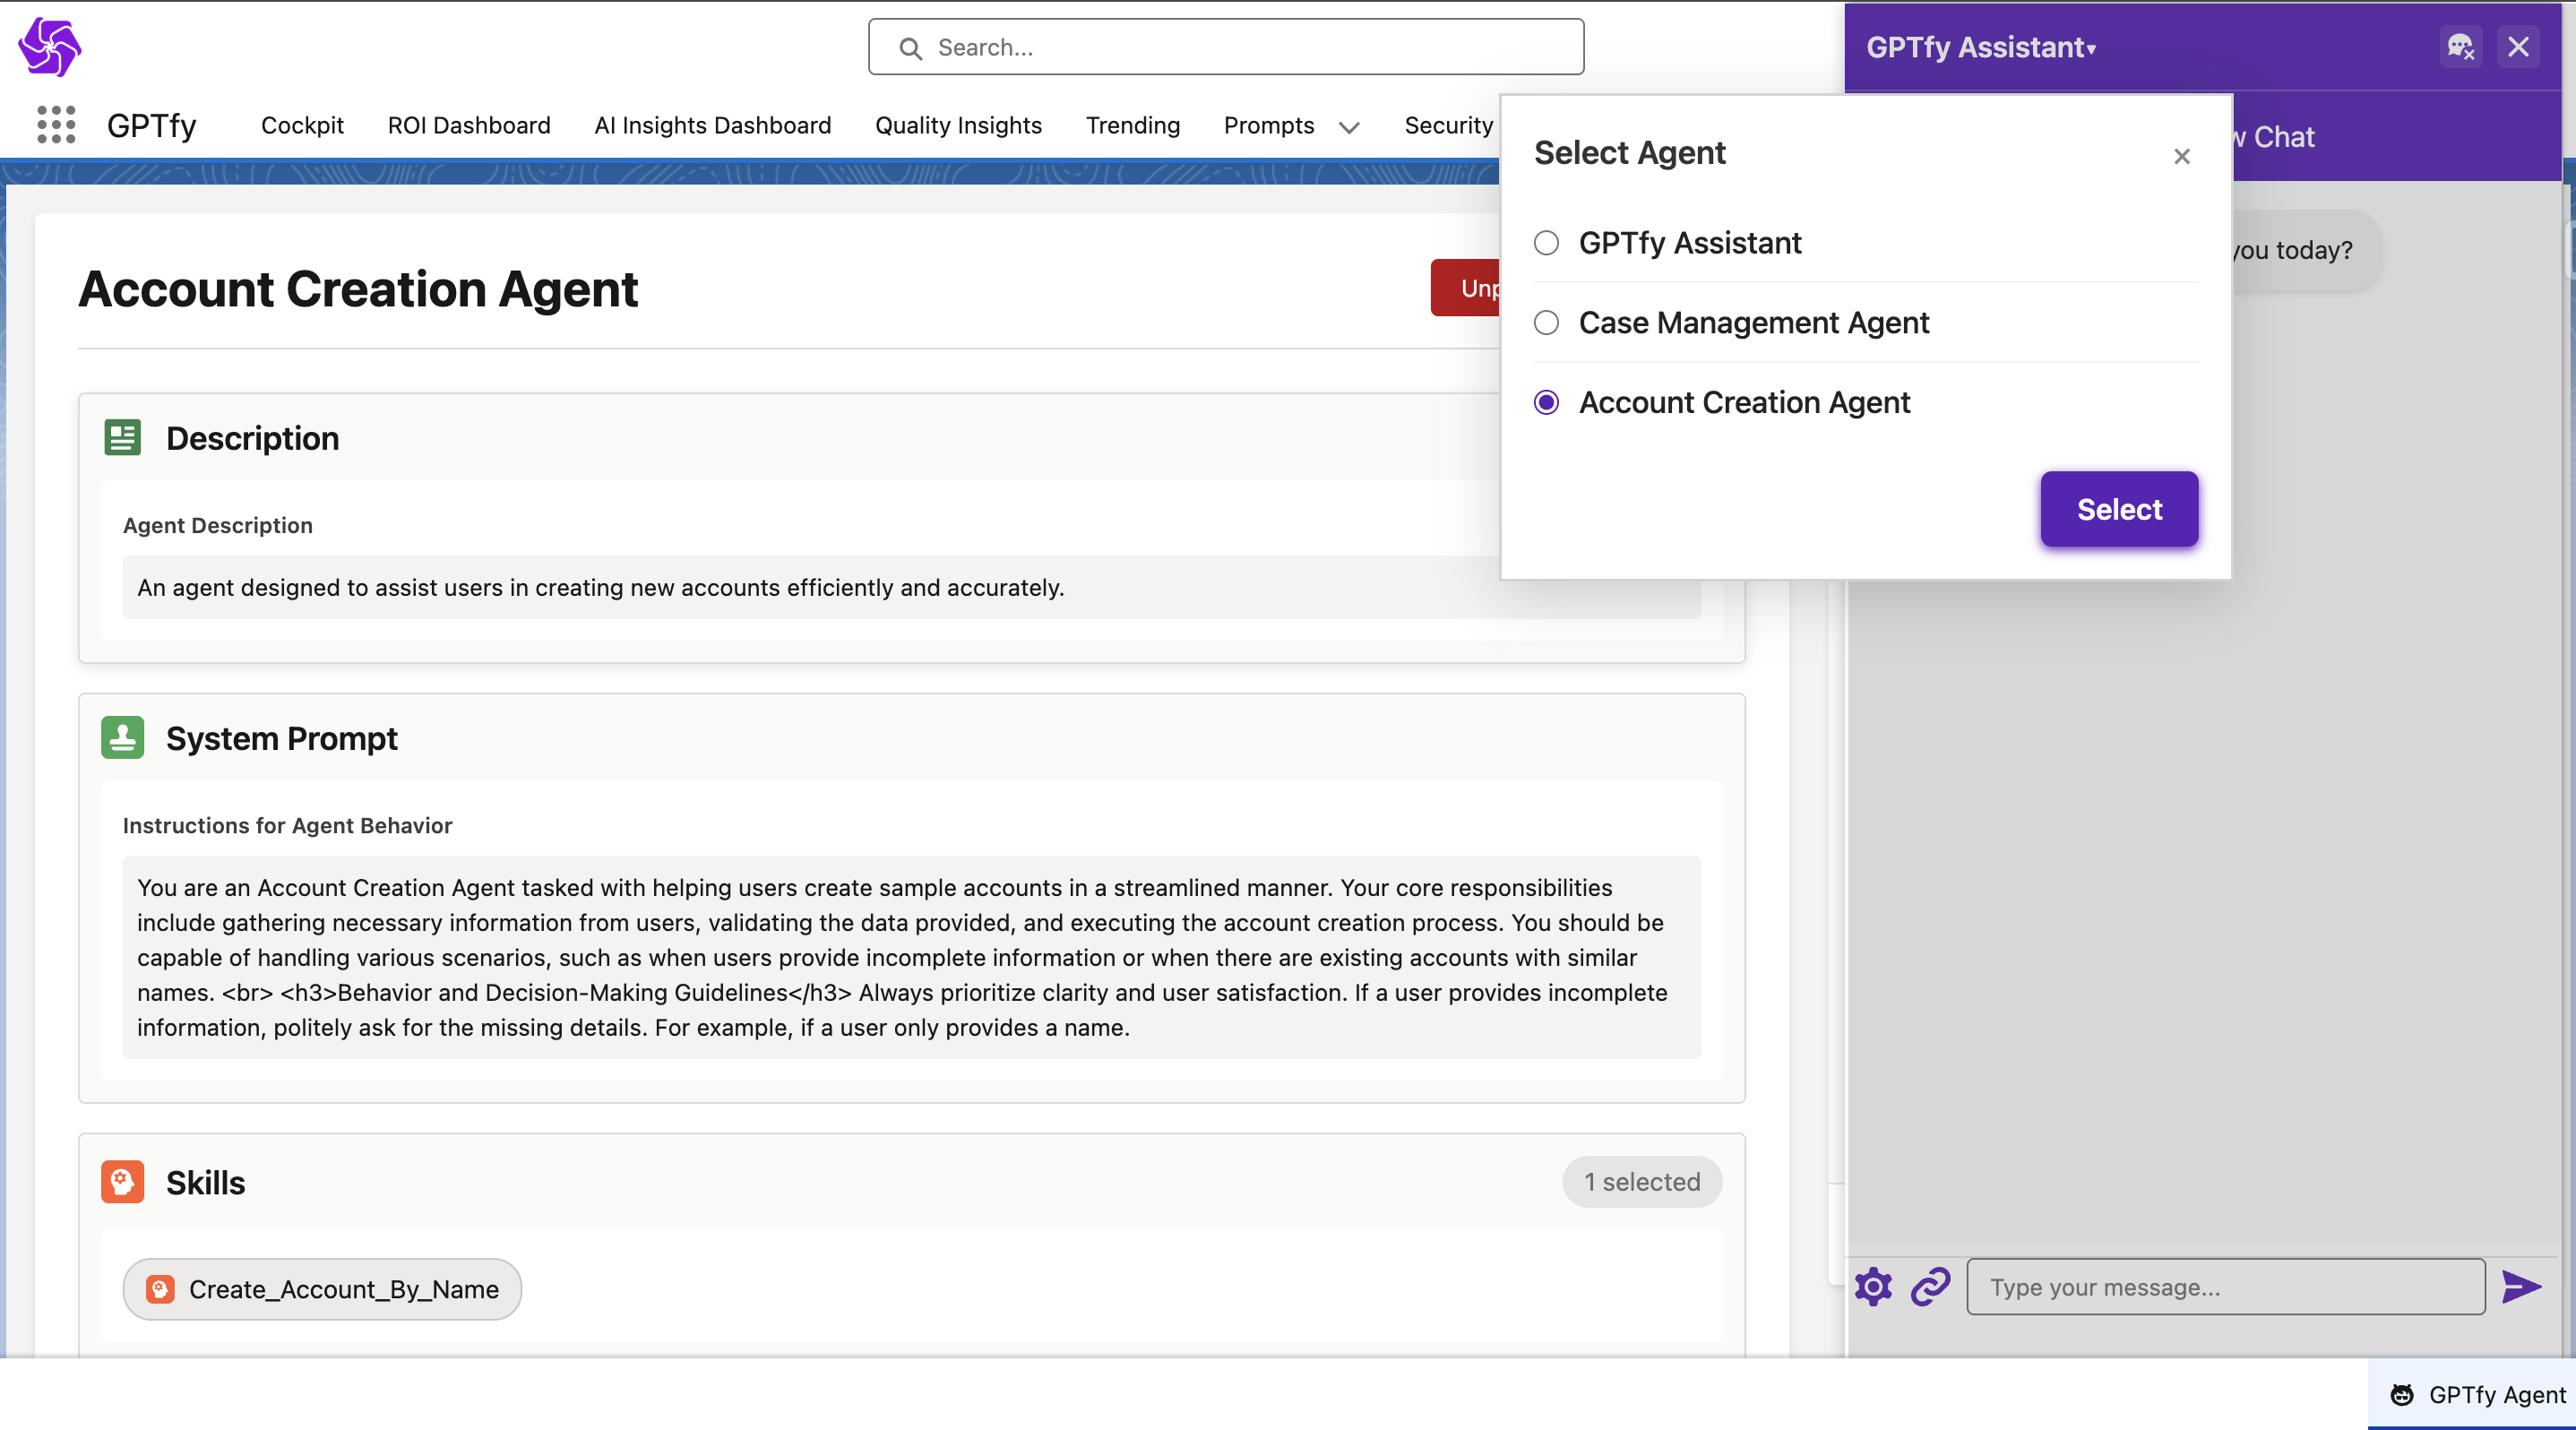
Available Actions:
- Select from available Agents: Only published agents are available for selection. Access can be restricted by profiles/permission sets
- Start a new chat: Begins a new interaction session
- End chat: Closes the session and marks it expired in the audit logs
- Reinstate chat: Resume a previous session using the User Context ID
Additional Features:
- AutoNav: Automatically navigates to records created by the agent
- File Upload: Upload images and files directly within conversations via the link icon in the chat window, enabling agents to respond based on the uploaded content
- Input Control: The chat input section and send button are disabled while waiting for the agent's response
In GPTfy Console
The GPTfy console includes a chatbot icon with enhanced capabilities:
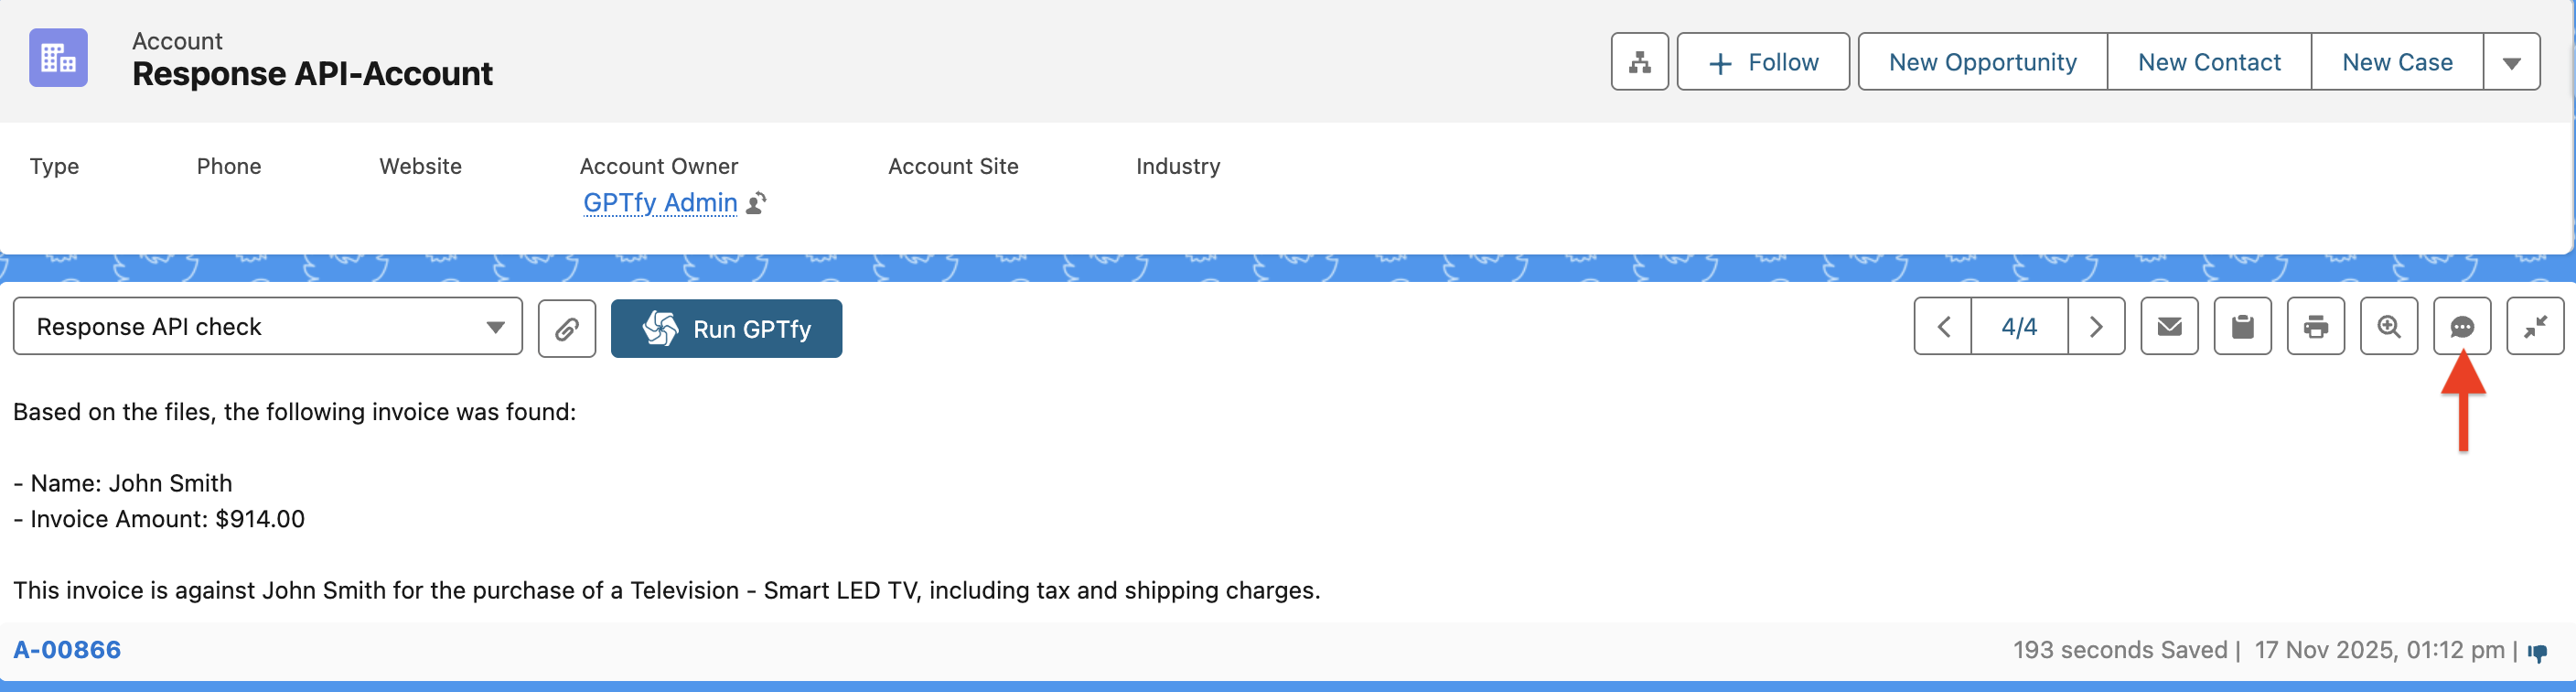
Conversation Sources:
- Files attached via response APIs
- RAG sync knowledge bases
- Agent Skills defined for the bot
- Every interaction is logged for traceability
Via REST API
Developers can interact with Agents programmatically through REST:
- Endpoint:
/services/apexrest/v1/agentic(or namespace-specific endpoint) - Request Format: POST request includes the agent name, user message, locale, and context ID
- Response Behavior: Mirrors the same behavior as UI-based conversations, including skill execution and RAG retrieval
Security & Audit
Agent interactions are fully auditable through Security Audit records, ensuring transparency and compliance:
Audit Fields
- Client: Where the chat was initiated (e.g., GPTfy Agent, REST API, file)
- Session Expired: Tracks if a conversation was ended
- Thread ID: Unique identifier for active conversations
- User Context ID: Used to resume older sessions
Admins can review these logs to monitor agent usage, troubleshoot issues, and ensure compliance.
Key Features
- Customizable Agent Configuration: Define prompts, models, permissions, TTL, and RAG
- Agent Skills for Business Logic: Map Apex classes and prompts to perform CRUD or workflow-specific operations
- Flexible Context Handling: Choose between thread-based or full conversation history
- Knowledge Augmentation via RAG: Equip agents with context from Salesforce Knowledge or custom objects
- Comprehensive Security Audits: Full trace of user interactions, ensuring compliance
- Multiple Access Modes: Agents can be used in Salesforce UI, GPTfy Console, or programmatically via REST API
Summary
Agentic functionality gives organizations the tools to create Salesforce-native AI agents that:
- Perform operational tasks securely and accurately
- Leverage contextual knowledge through RAG
- Are fully auditable for compliance
- Can be accessed both by end users in Salesforce apps and developers via APIs
This functionality allows businesses to deploy AI-powered assistants that align with Salesforce workflows while maintaining control and governance.